Part 1: Youden’s J as a Replacement for the Kvamme Gain Metric in the Evaluation of Archaeological Predictive Models

This is a study regarding the contextualization of the Kvamme Gain statistic, the evaluation of its characteristics, and justification for replacing it with the Youden’s J statistic for the evaluation of archaeological predictive models (APM) effectiveness based on single value metrics. This analysis is divided into two blog posts. Part 1 discusses the use of evaluation metrics, the characteristics of the Kvamme Gain (KG) statistic (the most common metric used to evaluate APMs), and then links the KG to the framework of the Confusion Matrix as a tool for evaluating classification problems.  A Confusion Matrix is simply a 2 by 2 contingency table of correct and incorrect predictions. By placing the Kvamme Gain in the framework of the confusion matrix we can link the poorly studied task of APM quantitative evaluation to the very well-studied task of machine learning classification model evaluation.  While archaeological data has unique characteristics that we will need to consider, the task of evaluating binary and multi-class classification is well documented and not unique to archaeology.

Part 2 of this post (not yet published) will then look at the characteristics of the KG and reveal some qualities that make is less appropriate for its use as a single value to evaluate APM. These qualities will be compared to the Youden’s J statistic and I will try to make a case for why it should be the primary APM statistic. The characteristics and relationship between these two metrics will be explored graphically to try to make some intuition regarding their usefulness.

Note: I strongly feel that a suite of appropriately chosen metrics is the most useful for evaluating model performance. However, boiling threshold-based classification performance down to a single number is a very common practice; so let’s do it the best we can.

“The key to keeping your balance is knowing when you’ve lost it” ~ Anonymous

So many metrics, so little time…

Archaeological Predictive Models, as well as all predictive models, typically require the quantification of their predictions in order to assess validity.  Simple enough, right?  Not so much.  There are a multitude of metrics, methods, tricks, and approaches to distilling a predictions accuracy (using that term here in its broadest sense) to a single number that has meaning for the prediction task at hand and the audience it is communicated to. Some metrics include simple accuracy (used here in its narrow form) as the % correct over the % incorrect, to the more elaborate Root Mean Square Error (RMSE), to more exotic things like entropy.  Each of these metrics, and a dozen more, have distinct characteristics that lend themselves to different problems and objectives.  However, it is suffice to say that there is no one correct metric to use in all, or even a majority of analytical problems.  This is because there will always be a loss of information when multiple and often competing measurements are summaries into a single number.  Yet we have a strong desire to condense complex information into an easily digestible unitary calculation regardless of the waste of valuable context.   Despite the apparent diversity and flexibility of many metrics, the blind application of any one performance metric to a predictive problem is a pretty quick way to end up with uninterpretable results that may not address your research or conservation goals.

Origins of the Kvamme Gain Statistic

In the case of most applications of APM, there are a set of constraints that are somewhat unique and require some thought about what metric best illuminates the results. In a 1988 publication [see here for review and download] Dr. Kenneth Kvamme described an evaluation metric for binary (i.e. thresholded) APMs:

Kvamme Gain

Continue reading “Part 1: Youden’s J as a Replacement for the Kvamme Gain Metric in the Evaluation of Archaeological Predictive Models”

Part 1: Youden’s J as a Replacement for the Kvamme Gain Metric in the Evaluation of Archaeological Predictive Models

Hypurrr-ameter Grid Search with Purrr and Future

See executable Rstudio notebook of this post at this Github repo!


I have had a thing lately with aggregating analyses into sequences of purrr::map() function calls and dense tibbles. If I see a loop – map() it. Have many outputs – well then put it in a tibble. Better yet, apply a sequence of functions over multiple model outputs, put them in a tibble and map() it! That is the basic approach I take here for modeling over a sequence of random hyperparameters (Hypurrr-ameters???); plus using future to do it in parallel. The idea for the code in this post came after an unsettled night of dreaming in the combinatoric magnitude of repeated K-folds CV over the hyperparameters for a multilayer perceptron. anyway…

“Correlated Hyperparameters”“ – Zoroaster Clavis Artis 1738 (inspired by @vboykis #devart)

This post is based on the hyperparameter grid search example, but I am going to use it as a platform to go over some of the cool features of purrr that make it possible to put such an analysis in this tibble format. Further, I hope this post gives people some examples that make the idea of purrr “click”; I know it took me some time to get there. By no means a primer on purrr, the text will hopefully make some connections between the ideas of list-columns, purrr::map() functions, and purrr:nest() to show off what I interpret as the Tidy-Purrr philosophy. The part about using future to parallelize this routine is presented towards the end. If already know this stuff, then skip to the code examples at the end or see this repo. However, if you are purrr-curious, give it a read and check out some of the amazing tutorials out in the wild. If you want to interact with the code and this Rmd file, head over to this Github repo where you can launch an instance of Rstudio server and execute the code!

  • Objective: Demonstrate an approach to randomly searching over model hyperparameters in parallel storing the results in a tibble.
  • Pre-knowledge: Beginner to Moderate R; introductory modeling concepts; Tidy/Purrr framework
  • Software: R 3.4.0, tidyverse 1.2.1 (contains tibble, dplyr, purrr, tidyr, and ggplot2), rsample 0.0.2, future 1.6.2


Optimizing hyperparameters

Hyperparameters are the tuning knobs for statistical/machine learning models. Basic models such as linear regression and GLM family models don’t typically have hyperparameters, but once you get into Ridge or Lasso regression and GAMs there are parts of the model that need tuning (e.g. penalties or smoothers). Methods such as Random Forest or Gradient Boosting, Neural Networks, and Gaussian Processes have even more tuning knobs and even less theory for how they should be set. Setting such hyperparameters can be a dark-art and require experience and a bit of faith. However, even with experience in these matters it is rarely clear what combination of hyperparameters will lead to the best out-of-sample prediction on a given dataset. For this reason, it is often desired to test over a range of hyperparameters to find the best pairing.

Continue reading “Hypurrr-ameter Grid Search with Purrr and Future”

Hypurrr-ameter Grid Search with Purrr and Future

A More Reproducible Research with the liftr Package for R

Reproducible research… so hot right now. This post is about a way to use “Containers” to conduct analysis in a more reproducible way. If you are familiar with Docker containers and reproducibility, you can probably skip most of this and check out the liftr code snippets towards the end. If you are like, “what the heck is this container business?”, then I hope that this post gives you a bit of insight on how to turn basic R scripts and Rmarkdown into fully reproducible computing environments that anyone can run. The process is based on the Docker container platform and the liftr R package. So if you want to hear more about using liftr for reproducible analysis in R, please continue!

  • Concept – Learn to create and share a Dockerfile with your code and data to more faithfully and accurately reproduce analysis.
  • User Level – Beginner to intermediate level R user; some knowledge of Rmarkdown and the concept of reproducibility
  • Requirements – Recent versions of R and RStudio; Docker; Internet connection
  • Tricky Parts
    • Installing Docker on your computer (was only 3 clicks to install on my Mac Book)
    • Documenting software setup in YAML-like metadata (A few extra lines of code)
    • Conceptualizing containers and how they fit with a traditional analysis workflow (more on that below)
  • Pay Off
    • A level-up in your ability to reproduce your own and others code and analysis
    • Better control over what your software and analysis is doing
    • Confidence that your analytic results are not due to some bug in your computer/software setup

More than just sharing code…

So you do your analysis in R (that is awesome!) and you think reproducibility is cool. You share code, collaborate, and maybe use Git Hub occasionally, but the phrase ‘containerization of computational environments’ doesn’t really resonate. Have no fear, you are not alone! Sharing your code and data is a great way to take advantage of the benefits of reproducible research and well documented in a variety of sources. Marwick 2016 and Marwick and Jacobs 2017 as leading examples. However, limiting ourselves to thinking of reproducibility as only involving code and data ignores the third and equally crucial component; the environment.

Simply, the environment of the analysis includes the computer’s software, settings, and configuration on which it was run. For example, if I run an analysis on my Mac with OSX version something, and Rstudio version 1.1.383, a few packages, and program XYZ installed it may work perfectly in that computational environment. If I then share the code with a co-worker and they try to run it on a computer with Windows 10, Rstudio 0.99b, and clang4, but not rstan and liblvm203a the code will fail with a variety of hard to decipher error messages. The process is decidedly not reproducible. Code and data are in place, but the changes to the computational environment thwart attempts are reproducing the analysis.

At this point, it may be tempting to step back and claim that it is user #2’s prerogative to make an environment that will run the code; especially if you won’t have to help them fix this issue. However, we can address this problem in straightforward way, uphold the ethos of reproducibility, and make life less miserable for our future selves. This is where Docker and containers come into play.

So what is a container?

Broadly speaking, a container is a way to put the software & system details of on one computer into a set of instructions that can be recreated on another computer; without changing the second computers underlying software & system. This is the same broad concept of Virtual machines, virtual environments, and containerization. Simply, I can make your computer run just like my computer. This magic is achieved by running the Docker platform on your computer and using a Dockerfile to record the instructions for building a specific computational environment.

There is a ton about this that can be super complex and float well-above ones head. Fortunately, we don’t need to know all the details to use this technology! The name “container” is a pretty straight ahead metaphor for what this technology does. Specifically a shipping container is a metal box of a standard size that stacks up on any ship and moves to any port regardless of what it carries and what language is spoken. It is a standardized unit of commerce. In that sense, the Docker container is a standardized shipping box for a computer environment that fits in a single file, ships to any computer, and contains any odd assortment of software provided it is specified in the Dockerfile. To this end, the idea is that you can pack the relevant specifics of your computer, software, versions, packages, etc… into a container and ship it with your code and data allowing an end user to recreate your computing environment and run the analysis. Reproducibility at its finest!

Continue reading “A More Reproducible Research with the liftr Package for R”

A More Reproducible Research with the liftr Package for R

A Brief diversion into static alluvial/Sankey diagrams in R

The alluvial plot and Sankey diagram are both forms of the more general Flow diagrams. These plot types are designed to show the change in magnitude of some quantity as it flows between states. The states (often on the x-axis) can be over space, time, or any other discreet index. While the alluvial and Sankey diagrams are differentiated by the way that the magnitude of flow is represented, they share a lot in common and are often used interchangeably as terms for this type of plot. The packages discussed here typically invoke (correctly IMHO) the term “alluvial”, but be aware that Sankey will also come up in discussion of the same plot format. Also, check out @timelyportfolio’s new post on interactive JS Sankey-like plots.

Charles Minard's Map of Napoleon's Russian Campaign of 1812
Charles Minard‘s Map of Napoleon’s Russian Campaign of 1812

Motivation

This post is motivated by a few recent events; 1) I required a visualization of the “flow” of decisions between two models; 2) my tweet asking for ways to achieve this in R; 3) the ensuing discussion within that thread; and 4) a connected thread on Github covering some of the same ground. I figured I would put this post together to address two issues that arose in the events above:

  1. A very basic introduction into the landscape of non-JS/static alluvial plot packages in R.
  2. Within these packages, if it is possible to use ordered factors to reorder the Y axis to change the order of strata.

To those ends, below is a surficial and brief look at how to get something out of each of these packages and approaches to reordering. These packages have variable levels of documentation, but say to say that for each one you can learn a lot more than you can here. However, it is a corner of data vis in R that is not as well known as some others. This view is justified by the twitter and Github threads on the matter. Of course as these packages develop, this code may fall into disrepair and new options will be added.

R packages used in this post

library("dplyr")
library("ggplot2")
library("alluvial")
# devtools::install_github('thomasp85/ggforce')
library("ggforce")
# devtools::install_github("corybrunson/ggalluvial")
library("ggalluvial")
library("ggparallel")

Global parameters

To make life a little easier, I put a few common parameters up here. If you plan to cut-n-paste code from the plot examples, note that you will need these values as well to make them work as-is.

Part of the issue in this post is to look at what ordering factors does to change (or more likely not change) the vertical order of strata. Here I set factor levels to “A”, “C”, “B” and will use this in the examples below to see what using factors does to each plotting function. This order was used because it does not follow either ascending or descending alphabetical order.

A_col <- "darkorchid1"
B_col <- "darkorange1"
C_col <- "skyblue1"
alpha <- 0.7 # transparency value
fct_levels <- c("A","C","B")

Simulate data for plotting

The initial thread I started on Twitter was in response to my need to visualize the “flow” of decisions between two models. One model is the results of a predictive model I made a few years back; these values are labelled as “Modeled” in the data below. The other model is a implementation of the statistical model where individual decisions were made to change predictions or leave them the same; here the implementation is labelled “Tested”. The predictions that were decided upon are simply called “A”, “B”, and “C” here, but these could be any exhaustive set of non-overlapping values. Other examples could be “Buy”, “Sell”, and “Hold” or the like. The point of the graphic is to visually represent the mass and flow of values between the statistical model and the implemented model. Sure this can be done is a table (as the one down below), but it also lends to a visual approach. Is it the best way to visualize these data? I have no idea, but it is the one that I like.

The dat_raw is the full universe of decisions shared by the two models (all the data). The dat data frame is the full data aggregated by decision pairs with the addition of a count of observations per pair. You will see in the code for the plots below, each package ingests the data in a slightly different manner. As such, dat and dat_raw serve as the base data for the rest of the post.

dat_raw <- data.frame(Tested  = sample(c("A","B","C"),100,
                                  replace = TRUE,prob=c(0.2,0.6,0.25)),
                  Modeled = sample(c("A","B","C"),100,
                                  replace = TRUE,prob=c(0.56,0.22,0.85)),
                  stringsAsFactors = FALSE)
dat <- dat_raw %>%
  group_by(Tested,Modeled) %>%
  summarise(freq = n()) %>%
  ungroup()
Table 1 – Simulated Data for Plotting
Tested Modeled freq
A A 7
A B 3
A C 8
B A 25
B B 7
B C 27
C A 8
C B 4
C C 11

ggforce

ggforce (https://github.com/thomasp85/ggforce)

ggforce is Thomas Lin Pedersen’s package for adding a range of new geoms and functionality to ggplot2. The geom_parallel_sets used to make the alluvial chart here is only available in the development version installed from Github. ggforce provides a helper function gather_set_data() to get the dat in the correct format for ggplot; see below.

Ordering – By default ggforce orders the strats (i.e. “A”, “B”, “C”) based on alphabetical order from the bottom up. There is no obvious way to change this default, but I am looking into it.

dat_ggforce <- dat  %>%
  gather_set_data(1:2) %>%        # <- ggforce helper function
  arrange(x,Tested,desc(Modeled))

ggplot(dat_ggforce, aes(x = x, id = id, split = y, value = freq)) +
  geom_parallel_sets(aes(fill = Tested), alpha = alpha, axis.width = 0.2,
                     n=100, strength = 0.5) +
  geom_parallel_sets_axes(axis.width = 0.25, fill = "gray95",
                          color = "gray80", size = 0.15) +
  geom_parallel_sets_labels(colour = 'gray35', size = 4.5, angle = 0, fontface="bold") +
  scale_fill_manual(values  = c(A_col, B_col, C_col)) +
  scale_color_manual(values = c(A_col, B_col, C_col)) +
  theme_minimal() +
  theme(
    legend.position = "none",
    panel.grid.major = element_blank(),
    panel.grid.minor = element_blank(),
    axis.text.y = element_blank(),
    axis.text.x = element_text(size = 20, face = "bold"),
    axis.title.x  = element_blank()
    )

ggforce-1

Continue reading “A Brief diversion into static alluvial/Sankey diagrams in R”

A Brief diversion into static alluvial/Sankey diagrams in R

What has GEO taught us about settlement archaeology?

As I was following along with the #CAAAtlanta hashtag from my desk, I saw this nugget from Philip Verhagen

My initial reaction was a blend of outrage interlaced with skepticism that flowed directly into self-doubt and melancholy, finally landing in reflection and a deeper questioning of the premise. In the end, I feel that this is a bit of a post hock ergo propter hock argument. It has been decades since I had a class on logic, so my categorization of the fallacy may be off.  The point is that I geospatial technologies aren’t capable of fundamentally altering our thinking about settlement archaeology.  However, they are capable of providing us new forms of observations, data, and tests that can contribute to the sorts of analysis and models that can provide new insight into the ways in which people of the past utilized the landscape.

“after this, therefore because of this”

I want to make sure it is stated that I have nothing but respect for Thomas Whitley.  He likely does not recall, but he and I discussed modeling at various conferences, he shared with me his methodology from his Spatial-Decision Making Model paper, and his work with Philip in various publications is exemplary. Further, it is obvious that a short tweet paraphrasing another’s sentiment is an easy target  devoid of its original context. That being said, I am going to use the his notion (communicated via Philip’s tweet), as my own straw man logical fallacy to argue against.

2lEETEb6.png

Any description of ‘geospatial technology’ would cover a wide array of methods and instruments for recording data with a spatial component.  Clear examples would include Geographic Positioning Systems (GPS), laser transits, and wireless data collection platforms. Expanding this a little further, we can include instruments for remote sensing including satellites to image the visible and non-visible spectrum, Ground Penetrating Radar (GPR), Light Detection and Ranging (LiDAR), electromagnetic and conductivity devices, or the dowsers willow sap for that matter. Slightly beyond this, we can include geospatial software such as ArcGIS, QGIS, PostGIS, Surfer, Idrisi, Grass, or the host of spatially oriented packages for R and Python. These are the tools allow us to apply statistical and analytical methods that consider the spatial component of our data in new and novel ways. An incredibly narrow survey of these methods would include correlation, kriging, Gaussian Processes, spatial random effects, Conditional Autoregressive (CAR) models, K-nearest neighbors, kernel methods, network analysis, cost paths, view sheds, and Agent Based Modeling (ABM) to name but a few.

In light of the tweet, I cannot say what defines a ‘fundamental’ alteration of our understanding entails.  Frankly, I am not even sure what entails ‘settlement’, but my assumption is that is refers to our collective understanding of how people of the past visualized, navigated, and utilized the landscape for economic, cultural, spiritual, personal, or any other reason. Even if Whitley meant something more specific with the term ‘settlement’ or more grand with the term ‘fundamental’, I find it unlikely that many archaeologists would argue that the list of above technologies has not contributed to a significant advancement in our conceptual understanding of how people lived on the landscape.

Perhaps it is that ‘settlement’ is such a vast concept, that it would be difficult to observe any one technology or methods ability to move the needle of our understanding.  Or perhaps it is more an issue of the ability to fundamentally change anyone’s etic perspective of what past people believed when they acted upon the landscape; or to understand past settlement at all through one’s given cultural filters.  If we navigate this towards an epistemological argument, then little is to be gained.  However using a more pragmatic notion of settlement as an archaeological expression of past lives interpreted from the patterns and artifacts observed in the archaeological record, then anyone would be hard pressed to suggest that geospatial technology has had a less than profound part to play. At least in my humble opinion.

As suggested earlier, it is not that geospatial technologies in and of themselves have the ability to provide insight into anything; there is no magic here.  However, as a framework for creating, extracting, organizing, and incorporating the characteristics of spatially explicit data into our studies of the past, they begin to realize their utility.  In short, if GEO has failed to inform us about settlement in archaeology, it is entirely our fault.

manager1600.png

LiDAR and Mesoamerica? Yup. Drones in Tanzania? I’d think so. Agent Based Models in the Pleistocene? Ask Premo, Lake or Crema. Madry and the availability of world coverage for hi-res satellite photos is of interest. T. Whitley himself as made quite important contributions using GEO to understand settlement. So how can he argue that GEO has not been a fundamental driver in our current understandings of settlement in any range of geographies and periods when he has contributed himself? Perhaps I am misreading the tweet, perhaps none of these constitute a ‘fundamental’ shift, or perhaps it was just a provocative statement to generate thought and discussion. If it is the latter, then i’ve taken the bait and you should too.


What has GEO taught us about settlement archaeology?

Archaeological Predictive Modeling Points of Discussion

sin4_header

In the past few weeks I was involved in two discussions with archaeological colleagues on topics specific to the process and issues associated with Archaeological Predictive Modeling (APM).  One conversation was via twitter with Dr. Colin Wren of the University of Colorado and the other with PhD in training Claire Boardman. The two conversations covered different aspects of the APM topic, but each seemed complimentary to the other.  I am posting excerpts from these discussions here for 1) posterity and 2) because I think they are really interesting questions which rarely get much attention outside of peer-to-peer conversations.  Also, truth be told, locational modeling of archaeology sites is still at the toddler stage (at best) in archaeology and simple questions like these are very valid discussion points. Anyway, perhaps you will find this interesting if you don’t know much about APM, you may find it useful if looking for a basis to instruct from, or useful is you want to frame your own thoughts and build from there.

The discussion with Wren was more specific to sort of grand challenges to APM; the why and how of a variety of approaches.  Colin had some great probing questions about theoretical issues, but I think I only answered from the methodical perspective.  I am often stuck there because I think we need applicable methods to explore the consequences of our data and theories before we know what is a useful approach and what is not.  I present the brief summary of what Colin and I discussed.  The conversation with Boardman was more about how APM is used in an applied setting; specifically Cultural Resources Management (CRM).  My answers to the questions she posed are pretty generalized and could be further sharpened with a more in-depth discussion.

Model Output in ASCII

Wren Discussion Summary

Big issues: representing uncertainty, overcoming poor samples, adjusting for sample and variable correlations, establishing model thresholds based on model purpose.

Solutions? developing a framework of model techniques/approaches that serve specific purposes/conditions (e.g. what works, what doesn’t and why), common data sets to serve as benchmarks so new methods are comparable, convince other archaeologists this is a worthwhile thing to teach their students!

Some background on the “Issues” from the discussion:

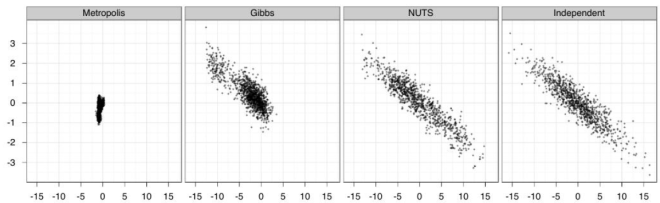
  • Uncertainty – documenting, propagating, visualizing uncertainty all around our models.  starts with acknowledging and accepting uncertainty, then to modeling it (bootstrapping, Credible Intervals, Bayesian approaches, modeling different scenarios, etc…). Visualizing via multiple maps, varying thresholds, bivariate color legends…
  • Poor Samples & correlation sample location bias, non-systematic sampling, imbalanced samples are all pretty serious issues. How to fix??? Let me know if you find out. Some components may include random sampling, explicit spatial variance/covariance, rebalancing, over/under sampling, SMOTE, hierarchical models, and what I am currently exploring, distribution regression [good explanation (PDF)].
  • Thresholds – I think this is the single most overlooked part of current modeling practices.  Anytime we classify into present/absent or high/medium/low we need to draw lines in the continuous distribution of probabilities/potential/sensitivity.  THis should be done very cautiously and with respect to the weight/risk assigned to false-positives vs. false-negatives.

sin2_header

Boardman Q&A

Development projects:

What is the main reason for creating predictive models?

Assuming we are considering a “predictive model” to be the forecasting of archaeological site locations based on correlated co-variates (environmental or otherwise), the main reason are to scope the field effort and help in budgeting.  They allow us to estimate the number of holes we will have to do and where we will likely target. They also give us a visual vehicle to share with the State Historic Preservation Office (SHPO) that we have considered sensitivity and what we think about it across the project area.  On a larger scale, they can be used to estimate potential impacts of various project alternatives.  In this sense, the % impact of site-likely area (or whatever the loss metric you chose) can be compared relatively between alternatives.  Models can also be made for research purposes.  As a model that seeks to understand the inference of model parameters will also generate predictions and is typically validated by them.  There are plenty of other reasons that one may want to generate predictions of a models that deal with site locations, but these are the most common.

What project types/locations would you normally create a predictive model for?

For almost any project, but they are more effective on larger and linear projects like pipelines and highways.  The Pennsylvania model I referenced above is now serving as a base model for any work done in that state.  Firms are free to make their own for a project, but need to reference it to the state model and compare findings.

At what stage in the development planning approval process?

Sometimes as early as the proposal stage; to get a sense of cost.  Otherwise the “Phase IA” stage, which is the initial assessment of sensitivity and potential project impacts prior to doing field work.

When you use predictive modelling:

Do you use a standard model design or create a bespoke model for each project?

A little of both.  There are a standard set of parameters we use for the very basic weighted overlay model, but they can be adjusted based on physiographic setting or prior knowledge.  If there are a number of known sites available to fit better parameters to, we do that.  Overall, the design of the model is based on the purpose.  If the purpose is to generate a model that can be easily discussed with the SHPO or Client, has variables that all archaeologists will be familiar with, and has easily discussed assumptions, the simple weighted overlay is the most common.  If in addition to these goals, I want to get a better understanding of site distribution in the study area and the marginal effect of variables on site locations, I may make an additional model via logistic regression, random forests, or random effects model depending on my goals.  If a Principal Investigator has a certain research question or prior information on the area, we can make a model that is based on these ideas as well.

Do you create your models using a GIS application and if so, which one?

A lot of it is done in ArcGIS, but also a lot is done in the statistical programming language R. R is essentially a GIS, as well as a full-fledged programing language. We use QGIS at times as well. In ArcGIS the raster calculator and other raster tools within the Model Builder framework are helpful, but it can be buggy, slow, and is not very open or reproducible.  R has a steeper learning curve, but offers nearly limitless ability to develop, visualize, and understand your models. QGIS is a great alternative (and sometimes go-to) to ArcGIS; it is fully capable.

On average how many models do you create in a year?

Speaking strictly of sensitivity model for archaeological locational data (aka “predictive model”), perhaps a dozen final models, but dozens of sub-models and candidate models.  The year and a half of building the PA model was thousands or tens of thousands of models.  However, we also create many archaeological models that do not serve the basic “predictive model” goals.

In your predictive models:

What datasets do you commonly use in your models?

1/3rd arc second (~10-meter) DEM, National Hydrologic Dataset (NHD), National Wetland Inventory (NWI), surficial and bedrock geology, many derivations of these base variables (e.g. variation in slope over a 3km neighborhood, cost-distance, or elevation below spring head), and known archaeological site locations. Viewshed, cost-paths, proximity to cultural locations are also possible choices.  Things that are often avoided are elevation, density of known sites, and proximity to known sites unless they are explicitly required for your purpose.

What method(s) do you use to validate your model?

Entirely depends on the model. Simple weighted overlay models with no known sites, validation is based on the archaeologists intuition.  For weighted models with sites available, the presence/absence of sites is the validation, For statistical models (regression, random forest, GLMM, etc…) the models have metrics such as AIC, BIC, R^2, sensitivity/specificity, AUC, and any number of other things.  A test set can be held-out to test on “independent” data that was not used in the model building, or better yet, K-Folds Cross-Validation is used to create many hold out samples.  The point of validation is not simply to put a number to accuracy, but to balance accuracy vs. precision and bias vs. variance.

What level of accuracy/precision do you expect/accept?

Completely depends on the purpose of the model as any model is capable of 100% accuracy if the entire study area is considered site-likely or 0% accuracy if it is entirely site-unlikely, the answer is somewhere in between. [The basis of every model should be the purpose that it is intended, then all modeling methods grow from there.  However, the most common approach in archaeology is to build a model, then find a purpose for it.]  If it were a model designed to find the most highly sensitive locations because you wanted to find a specific type of site for testing, the overall accuracy may be low, but with high precision. As you are targeting a part of the distribution, but don’t care if you missed some outliers.  If your model is to broadly protect all potential site likely areas regardless of survey time or funding, you may choose high accuracy and low precision; as you don’t mind a model that considers vast areas as site-likely as long as 100% of sites are accounted for. (I write about this topic a bunch in the 7 volumes of the PA model report).

Far to often, people just make a general model, then apply ad-hoc threshold that achieve an accuracy/precision that “looks good”, and then present it as capable of fitting every purpose.  In actuality it is generalized out of fitting any purpose.  The key is to balance accuracy/precision on top of bias and variance.  A model with great looking accuracy/precision balance (even considering model purpose) can be resulting from an over-fit model with high variance.  So the model looks great on the known data, but does not generalize well to new data.  On the other hand, a model with pretty bad apparent accuracy/precision balance can be built on a model that is balanced bias and variance, so it generalizes to new data much better than the over-fit model that had much better looking accuracy/precision.  In the end, you hope to maximize the accuracy that is possible given your dataset, variables, signal to noise ratio, and model (assumptions), while minimizing your risk of overfitting relative to the desired purpose of the model.

It’s turtles all the way down… For the PA model sensitivity class boundary thresholds for individual models are optimized for  no less than 85% of known site-present cells (10×10-meter) where correctly included within the combined high and moderate sensitivity area that covered that covered no less than 33% of the study area.  This equates to a target specificity of 0.85 and sensitivity of 0.67.  The fact that is it “no less than 33%” is because we need to leave plenty of room for false-positives as they are the locations where we hope to look for sites (they are false positives until a site is found then they are true-positives).  Maximizing specificity (site’s correctly identified) is great, but maximizing sensitivity (the area the model considers site-unlikely) is dangerous because it will lead to picking an over-fit model; bad news.  It is good to pick a target sensitivity based on the projects goals.

*I used the term accuracy here as a stand-in for any measure of model correctness, but in archaeological modeling where the site-present and background samples are frequently severely imbalanced, the use of accuracy (the percent of observation correctly classified) will be very misleading.  This is because the larger number of correctly identified site-unlikely background observations will swamp the fewer incorrect site-likely observations and suggest a very high accuracy when the class we care about (site-likely) may have a very low accuracy.  A metric that weights for class is preferable.

Do you ever use predictive modelling for non-commercial / research projects?

All the time.  It is my main area of study for the past 20 years.  My blog has some examples

fin-2

Archaeological Predictive Modeling Points of Discussion

data.table v. dplyr execution time

Execution Time of data.table vs dplyr

This code shows the difference in execution time and rate of execution time increase for an analysis function coded in two different approaches, 1) data.table, and 2) dplyr. This analysis is the result of working with this function and using profvis to optimize. The end result is that the data.table version is much faster across all simulations and scales much better than the dplyr version. Please read through and check out the profvis results linked in the list below.

Notes:

  • The full code of this comparison can be found here
  • I use profvis to profile the execution time of each function, the full results are here for dplyr and here for data.table
  • I love dplyr and use it for everything. This is not intended as a critique, just some information on execution speed
  • My use of dplyr may not be optimum and may be contributing to the speed issues
  • the overall approach could also be optimized, but it represents a typical use-case balancing code clarity and function
  • If you see a flaw or speed trap in any of the code, please let me know. Thanks.

Finding

Data.table approach is 0.124 seconds faster at 10 sites/events, is 0.922 seconds faster, at 25,000 sites/events, and is 1.735 seconds faster at 50,000 sites/events. For every 1000 sites/events added the data.table approach execution time increases by 0.0277 seconds; dplyr increases at a rate of 0.3765 seconds.

Functions

Below are the two versions of the same function.

The function being tested here computes the aoristic weight for a series of simulated data. What an aorsitc weight is really doesn’t have much to do with this post, but if you are interested, more information can be found here. This somewhat obscure function is useful here because it is an example of the sort of function that an analyst would have to code themselves and therefore run into the decision of using dplyr or data.table. Obviously, you could write this is C++ or do something else to optimize it if that was your priority. However, this is a more realistic comparison (IMHO), as much of an analyst’s time is spent balancing optimization versus getting-stuff-done.

note: there is a little weirdness with negative dates and start/end dates. This is because I started out with BCE dates and then switch to years BP dates to match another analysis. So, it is little bit of a hodge-podge in dealing with BCE and BP.s

data.table version

my_aorist_DT <- function(events, start.date = 0, end.date = 2000, bin.width = 100) {
  require(data.table)
  setDT(events)
  time_steps <- data.table(
    bin.no  = seq(1:(abs(end.date)/bin.width)),
    Start = seq(start.date,(end.date-bin.width), by = bin.width),
    End   = seq((start.date+bin.width),end.date, by = bin.width))
  setkey(time_steps, Start, End)
  overlap_names <- data.table::foverlaps(events, time_steps,
                                         type = "any", which = FALSE)
  overlap_names <- overlap_names[i.Start != End & i.End != Start]
  overlap_names[, duration := (i.End - i.Start)]
  overlap_names[, W := (bin.width / duration)]
  ov_sum <- overlap_names[, .(aorist = sum(W),
                              median_step_W = median(W),
                              site_count = .N), keyby=.(bin.no)]
  setkey(ov_sum, bin.no)
  setkey(time_steps, bin.no)
  ov_sum2 <- ov_sum[time_steps, nomatch = NA]
  ov_sum2[is.na(ov_sum2)] <- 0
  ov_sum2[, bin := paste0(Start, "-", End)]
  return(ov_sum2)
}

dplyr version

my_aorist_dplyr <- function(events, weight = 1, start.date = 0, end.date = 2000,
                      bin.width = 100, round_int = 4) {
  require(dplyr)
  require(data.table)
  time_steps <- data.frame(
    bin.no  = seq(1:(abs(end.date)/bin.width)),
    Start = seq(start.date,(end.date-bin.width), by = bin.width),
    End   = seq((start.date+bin.width),end.date, by = bin.width))
  setDT(time_steps)
  setDT(events)
  setkey(time_steps, Start, End)
  overlap_names <- data.table::foverlaps(events, time_steps,                                           type = "any", which = FALSE) %>%
    filter(i.Start != End & i.End != Start)
  aorist <- overlap_names %>%
    data.frame() %>%
    group_by(name) %>%
    mutate(site_count = n(),
           W = (bin.width / (i.End - i.Start)),
           W = round(W,round_int)) %>%
    arrange(name, bin.no) %>%
    group_by(bin.no) %>%
    summarise(aorist = sum(W),
              median_step_W = median(W),
              site_count = n()) %>%
    right_join(., time_steps, by = "bin.no") %>%
    replace_na(list(aorist = 0, site_count = 0, median_step_W = 0)) %>%
    mutate(bin = paste0(Start, "-", End)) %>%
    dplyr::select(bin, bin.no, aorist)
  return(aorist)
}

Simulation Loop

The simulation loop simply loops over the 1001 site/event counts in sim_site_count_seq. For each loop, both functions are executed and the time it takes to run each is recorded into the table below.

To see the full code for this list, check it out here.

measure
site_count_min 10.000
site_count_max 50000.000
dplyr mean (seconds) 0.995
DT mean (seconds) 0.095
max difference (seconds) 1.981
min difference (seconds) -0.002
mean difference (seconds) 0.900
mean RMSE 0.006

Plot results

DT_dplyr_compare.png

data.table v. dplyr execution time

Estimating a Beta Distribution with Stan HMC

zelda_oot-storms.png

Puttin’a Prior on it

This is a post based on Julia Silge’s post on estimating a beta distribution using Billboard’s Year-End Hot 100 song lyrics from 1958 to 2014. As you see from my lame title, my post will not be nearly as witty or well-designed as hers, but you may find this extension of her work interesting. I conducted this analysis of the Bayesian Blues methods/data for a few reasons:  1) I had picked up a few ideas on using Stan for density estimation and wanted to try them out, 3) I am always on the lookout to practice with dplyr/tidverse; 3) I really enjoy the beta distribution and its intuition (see @drob’s SE post); and 4) Silge’s analysis provided a really cool method and interesting data, of which she was kind to share both (Silge on GH). The data, code, and a commented full markdown of my analysis are posted on GitHub.

Singing the Bayesian Beginner Blues

As noted, the analysis goals and data in this post are directly based on Julia Silge’s post entitled Singing the Bayesian Beginner Blues.  That post used the Empirical Bayes method for beta parameter point estimation and establishing the uncertainty around measurements of U.S. state names mentioned within a large database of song lyrics (courtesy of Kaylin Walker).  Silge’s post first approximates the parameters of a beta distribution from her data (the Empirical part) and then use those parameters and Bayes Theorem  to approximate a rate for each state if it were derived from that beta distribution. Finally, Silge derived a posterior distribution for each state’s rate; from which that uncertainty around the rate was visualized as the 95% Credible Interval.  This is a really cool approached and is demonstrated with great visualizations.  While reading it, I was inspired to figure this out in Stan and started messing with some code.

The primary differences in this analysis include:

  1. Is zero inflated to include states not mentioned in lyrics
  2. Incorporates mentions of cities with >= 100k population aggregated to their state and compares to analysis without city counts
  3. Utilizes Hamiltonian Monte Carlo via rstan to estimate parameters, propagated uncertainty, and predict state mention values given priors, data, and likelihood.

Estimating Beta Parameters with Stan

The approach in this post uses Stan, a probabilistic modeling language, to achieve the beta parameter estimation, propagate uncertainty, and predict a posterior distribution for each state, as well as the entire population of song-lyric-mention-rates.  Stan is a modernized version of BUGS and JAGS that is cross-platform and endlessly flexible for estimating a huge range of models.  The Stan website is very informative and there are a number of videos of presentations that helped me get my head around the concepts.  The very basics of Stan are an No U-Turns (NUTS) Adaptive Hamiltonian Monte Carlo (HMC) sampling engine and a language with which to declare your model.  The code for the model gets compiled into C++, the model is sampled with HMC, and the posterior is computed with samples returned to the user as a convenient R object.

Stan_posterior_example_Fotor_Fotor.png

That above image is from utilized in one of Benjamin Goodrich’s presentations (and also used Bob Carpenter in one of these videos) [Edit: Bob Carpenter created this image and it has been used by the Stan team in various presentations] to illustrate the efficiency in the HMC NUTS algorithm. Compared to Metropolis and Gibbs, HMC NUTS explores the true posterior (right-most panel) way more effectively and efficiently.  There is no contest there.

stanlogo-main-300x300.png

On a conceptual level, two primary differences between the Stan approach and the Empirical Bayes (EB) approach is that Stan (and other MCMC style samplers) integrates over distributions where the EB uses point estimates. With distributions, we can propagate uncertainty through all of the steps of the modeling sequence. Secondly, the full Bayesian approach uses priors to regularize the parameter estimates given the data and model.  The end result is control over the amount of regularization based on choice of priors and the ability to understand uncertainty because every parameter has a distribution of its plausible values.

In my previous post on estimating Pokemon CP, I did a very similar task by estimating a beta distribution density with JAGS.  The approach here with Stan is more sound than the JAGS approach as HMC is a better sampler than the Gibbs sampler of JAGS, and that I incorporate the prediction of new values within the model. In the previous example, I used a range of beta parameters extracted from the posterior to re-model the predictions.  Doing this as a generated quantities in Stan more accurately propagates the uncertainty.

The Model: State Mentions in Song Lyrics as a Beta

The beta distribution is thought of as a succession of binomial trials of successes and failures. As such, it covers the domain of a distribution of probabilities of success. To think of it as a rate of success is to conceptualize the problem here as: How many song mentions per unit of population?

  • successes = how many songs successfully mention a state by name
  • attempts = a state’s population in units of 100k people (or 1,000,000 in Silge)

There is a bit of a dis-junction in intuition here as the success and attempts are on two completely different scales and it is not limited to the domain of [0,1]; there is no upper bound on the number of songs that mention a state relative to population.  An example of a more intuitively sound beta is Robinsons’s batting average whereas counter to the song mentions example, you cannot have more hits than at bats so it remains between [0,1].  However despite this disjunction, there is still ground for the state based interpretation; it is a very useful and convenient distribution, and Silge showed that it fits the observed data pretty darn well. So we go with it! [note: I modeled these data a few other potential distributions, and beta ‘won’ in terms of log likelihood.]

The models follows as such:

x\sim beta(\alpha,\beta)\\ \alpha \sim \text{half-normal}(1)\\ \beta \sim \text{half-normal}(10)

predictions for states are drawn from:

\tilde{x} \sim beta((successes + \alpha), (attempts - n + \beta))

Continue reading “Estimating a Beta Distribution with Stan HMC”

Estimating a Beta Distribution with Stan HMC

Pokémon GO post-evolution CP: A model

TL:DR

The punchline: It appears that firstly, the metric of Pokémon CP is correlated directly to HP with few, if any, other related metrics.  Secondly and perhaps more interestingly, that the post_evolution CP increase is a random draw from a parameterized beta distribution centered on a CP percent increase specific to each Pokémon species. Let me explain…

Black and White Pokeball Outline

Ok, this is a bit odd.  Before last month, all I knew of Pokémon was a yellow thing called Pikachu and something about a card game.  Then Pokémon Go came out a few weeks ago, and I decided to check it out.  Now I am an avid player and find the intricacies quite interesting; in addition to the psychology of the game play.  I don’t spend too much time reading the internet about the game, but it is fun to merge the game with an analysis.  The following post is akin to an Exploratory Data Analysis (EDA) of the data; not a full inference or comprehensive study.  The full code for this analysis can be found at this Gist.

Why bother?

The ever enjoyable Data Machina email newsletter included a link to a Pokémon dataset on OpenIntro in the last edition and I followed it down the rabbit hole. This data set contains the observations of a number of measurements of a specific Pokémon species before and after a series of evolutions. For non-Poké people, one goal of the game is to collect Pokémon and then evolve them into more powerful forms.  The metric for “more powerful” is the Combat Power (CP).  Like many things in this game, the mechanism behind how the CP is calculated and effected by evolution is unknown.  However, I am sure a quick Google search will turn up plenty of ideas.  The purpose of the data set on OpenIntro is to look at these variables and try to discover how the CP is modified by an evolution.  The end game to that quandary is to more efficiently select the best Pokémon to spend your limited resources on to evolve.  The final chapter is this narrative is that a more efficiently evolved Pokémon will allow you to be more competitive in gym battles and therefore represent your team (one of Blue, Yellow, or Red), gain Pokémon coins, and attract more rare Pokémons.  If a little insight on how the underlying mechanism of CP works gets you there faster, all the better.

95d5cded00f3a3e8a98fb1eed568aa9f

The intent of the posting of this data set on OpenIntro is to see if the provided variables contribute meaningfully to the data generating mechanism of the CP relative to evolutions.  As stated on the site:

A key part of Pokémon Go is using evolutions to get stronger Pokémon, and a deeper understanding of evolutions is key to being the greatest Pokémon Go player of all time. This data set covers 75 Pokémon evolutions spread across four species. A wide set of variables are provided, allowing a deeper dive into what characteristics are important in predicting a Pokémon’s final combat power (CP).

Example research questions: (1) What characteristics correspond to an evolved Pokémon with a high combat power? (2) How predictable is CP from an evolution?

Good questions.  The analysis that follows takes a quick look at Q1, concluding that most of the action is in the HP and few other variables.  Question 2 is the more direct focus of this post, but I formalized the question a bit: What accounts for the variation in CP gain per evolution within a given species?

The Data

The data from OpenIntro is pretty limited; no Big Poké Data here.  There is a total of 75 observations from pre and post-evolutions of Pokés from four different species.  The species are an important distinction.  This analysis will recognize the variation between species, but try to find a universal model that fits all species.  Note the difference in sample size between species.  The uncertainty of small sample size has an important effect here.

> colnames(pokedat)
[1] "name" "species" "cp"
[4] "hp" "weight" "height"
[7] "power_up_stardust" "power_up_candy" "attack_weak"
[10] "attack_weak_type" "attack_weak_value" "attack_strong"
[13] "attack_strong_type" "attack_strong_value" "cp_new"
[16] "hp_new" "weight_new" "height_new"
[19] "power_up_stardust_new" "power_up_candy_new" "attack_weak_new"
[22] "attack_weak_type_new" "attack_weak_value_new" "attack_strong_new"
[25] "attack_strong_type_new" "attack_strong_value_new" "notes"
>
 Species Count
Caterpie 10
Eevee 6
Pidgey 39
Weedle 20

Thinking about the data and the two questions above, my interest turned towards univariate correlation between the variables offered figuring out that the real metric is. Diagnosing correlation would be a visual approach that offers an understating of what is moving in-step with what.  Of course “correlation is not… ” and all that, but it sure as heck doesn’t hurt when you are trying to develop a data generating model.  The metric of interest is not only the pre and post-evolution CP (cp and cp_new respectively), but some permutation of that incorporated the fact that species seems to have a big effect on the output.

pokedat <- as_tibble(read.csv(&quot;pokemon.csv&quot;))

dat1 <- mutate(pokedat, delta_cp = cp_new - cp) %>% # net change in cp
# the % change in cp from old to new
mutate(pcnt_d_cp = delta_cp / cp) %>%
# group by species to calculate additonal varaibles
group_by(species) %>%
# species grouped mean percent change
mutate(spec_mean_pdcp = mean(pcnt_d_cp)) %>%
# species grouped std dev of % changes from old to new cp
mutate(spec_mean_pdcp_sd = sd(pcnt_d_cp)) %>%
# difference in % delta cp (pdcp) change from species group mean
mutate(cent_spec_mean_pdcp = pcnt_d_cp - spec_mean_pdcp) %>%
# z score for pdcp change within species group
mutate(z_spec_mean_pdcp = cent_spec_mean_pdcp / spec_mean_pdcp_sd) %>%
data.frame()

Pokemon-Go---Team-Mystic-_Converted_large

the modification of the data in the code above spells out the development of the desired metric.  Since with are talking about an evolutionary process, the desired metric has to do with chance in states.  In this case the change from pre to post-evolution CP; referred to at the delta CP.  Further, since we have multiple species (and there are many more than four in the Pokémon universe), we consider delta CP relative to the mean of each species.  Finally, as each species has a different range of CP as some species are more powerful than other, it is good to look at the percent change per species, as opposed to an absolute CP increase.  Based on these observations, the desired metric is based on the Percent Delta CP (PDCP) per species.  The metric is the PDCP and it is considered relative to each species; or spec_pdcp.  This is the metric that we seek to identify a data generating mechanism for.

Correlation = Where’s the party?

Rplot04.png

Continue reading “Pokémon GO post-evolution CP: A model”

Pokémon GO post-evolution CP: A model

ggplot2 step by step

Building a ggplot2 Step by Step

I have included this viz on my blog before; as an afterthought to a more complex viz of the same data.  However, I was splitting out the steps to the plot for another purpose and though it would be worth while to post this as a step-by-step how to.  The post below will step through the making of this plot using R and ggplot2 (the dev version from Github).  Each code chunk and accompanying image adds a little bit to the plot on its way to the final plot; depicted here.  Hopefully this can help or inspire someone to take their plot beyond the basics.

13


Step 1 is to load the proper libraries which include ggplot2 (of course), ggalt for the handy ggsave function, and extrafont for the use of a range of fonts in your plot.  I did this on a mac book pro and using the extra fonts was pretty easy.  I have done the same on a windows machine and it was more of a pain.  Google around and it should work out.

library("ggplot2") # dev version
library("ggalt") # dev version, for ggsave()
library("extrafont")

Create the data… I included R code at the end of the post to recreate the data.frame that is in the plots below.  You will have to run that code block to make an object called dat so that the rest of this code will work.

# run the code block for making the 'dat' data.frame.
# code is located at bottom of this post

So that whole point to why I was making this plot was to show a trend in population change over time and over geography.  The hypothesis put forth by the author of this study (Zubrow, 1974) is that over time population decreased in the east and migrated to the west.  The other blog post I did covers all of this in more details.

If one were starting out in R, they may go straight to the base plot function to plot population over time as shown below.  [to be fair, there are many expert R users that will go straight to the base plot function and make fantastic plots.  I am just not one of them.  That is a battle I will leave to the pros.]

# base R line plot of population over year
plot(dat$Population ~ dat$Year, type = "l")

1

That result is underwhelming and not very informative.  A jumble of tightly spaced lines don’t tell us much.  Further, this is plotting data across all of the 19 sites we have data on. Instead of pursuing this further in base plot and move to ggplot2.

ggplot2 is built on the Grammar of Graphics model, check out a quick intro here.  The basic idea is to plot by layers using data and geometries intuitively. To me, plotting in ggplot2 is much like building a GIS map.  Data, layers, and geometries; it all sounds pretty cartographic to me.

Continue reading “ggplot2 step by step”

ggplot2 step by step